Latest Entries »

Windows Communication Foundation (WCF) is a framework for building service-oriented applications. Using WCF, you can send data as asynchronous messages from one service endpoint to another. A service endpoint can be part of a continuously available service hosted by IIS, or it can be a service hosted in an application. An endpoint can be a client of a service that requests data from a service endpoint. The messages can be as simple as a single character or word sent as XML, or as complex as a stream of binary data.

WCF Everything

WCF is used to design, implement and deploy distributed applications. While creating such applications was possible prior to the existence of WCF, WCF makes the development of endpoints easier than ever. In summary, WCF is designed to offer a manageable approach to creating Web services and Web service clients. WCF is designed using service oriented architecture principles to support distributed computing where services have remote consumers. Clients can consume multiple services; services can be consumed by multiple clients. Services are loosely coupled to each other. Services typically have a WSDL interface (Web Services Description Language) that any WCF client can use to consume the service, regardless of which platform the service is hosted on.

WCF Feature Highlight :

WCF is a flexible and robust platform. Here is the list of all major WCF features.

    1. Endpoints: Addresses, Bindings, and Contracts

    2. Data Transfer and Serialization

    3. Sessions, Instancing, and Concurrency

    4. Transports in Windows Communication Foundation

    5. Queues and Reliable Sessions

    6. Transactions

    7. Windows Communication Foundation Security

    8. Peer-to-Peer Networking

    9. Metadata

    10. Clients

    11. Hosting

    12. Interoperability and Integration

    13. WCF Web HTTP Programming Model

    14. WCF Syndication

    15. AJAX Integration and JSON Support

    16. WCF Discovery

    17. Routing

    18. Workflow Services

I will explore each and every feature listed here in coming blog posts. In Next post I will try to explain WCF architecture and fundamental terms.
Click “Follow” in right-bottom corner of your screen to subscribe to this blog and to have all new blog posts directly in your inbox.

I have been thinking to start a multi-part blog series targeting a latest Microsoft Technology. Purpose of which was to share my knowledge on the same and to acquire more in depth awareness on the technology. There were many techs on my list like C# language, Silverlight, WCF, Entity Framework, N-Hibernate, Telerik Controls etc… After enough brain storming for deciding on one of it, I have selected WCF – Windows Communication Foundation.

WCF Everything

Reasons for which I decided to write on WCF…

  1. For having more exposure to most trending, most buzzing technical terminology “SOA” – Service Oriented Architecture.
  2. All .Net client technologies like Silverlight, WPF, Windows Phone or even ASP.Net somewhere-somehow are integrating with WCF to communicate with another client, server or service. So while learning WCF, I will be having encounter-exposure to almost all diverse .Net technologies.
  3. Also targeting to take up MCTS certification in 2013 first quarter for which also I have decided to go with WCF.

Content of Blog Series…

  • It won’t be just WCF centric blog series at all. In fact while talking-writing about WCF we will also get in to integration details with other client techs also. And not just clients only but also we will try to have some exposure on WCF integration with latest stuff like caching, virtualization, cloud computing (largely on Microsoft Azure Platform).
  • Specifically I will start with explaining… What is WCF? Why is WCF required? Then progressively we will get in to ABC (Address, Bindings, and Contract) of WCF, SOAP, and REST with in-depth exploration of the same. And at last I will end up with high end integration scenarios like working with concurrency, transactions, sessions, web sockets and more.

Resources…

  • With each blog I will provide the source code for the samples I will be creating plus will provide with links to online docs, samples, videos on the related topic as well. And of-course comments, questions and discussions are always invited.
  • All the coding will be done in Dot Net Framework 4.5 with Visual Studio 2012 RC installed on Wndows 8 RC.
  • I will be writing all WCF blogs under new category called “WCF Everything”. I also will be keep writing on non WCF .Net stuff as well. So be prepared, be ready for some exciting reading on WCF.
Click “Follow” in right-bottom corner of your screen to subscribe to this blog and to have all new blog posts directly in your inbox.


Visual Studio Snippets… Very useful but not really widely discussed topic at all at workplaces. Recently one of my colleagues shared a snippet file to use but many of my other colleagues around me were not really very familiar with the snippet concept itself. So here I am with worth reading blog on Snippets.

Snippets are the code blocks which can be defined as templates in xml format with well-defined elements and attributes.   The example of most common snippet is “prop”/”propfull” in visual studio which many of us are using in day to day code writing. We just need to type “prop” and press Tab key twice and visual studio will generate generic code block for property in code behind file.

Create Snippet…

Now we will create a new snippet “propfpc” for Property but with some addition to default “prop” snippet.

  1. Copy following xml code to Notepad file.
  2. Save File with .snippet extension.
  3. Observe the file which is very well self explanatory with well defined Elements and Attributes.

<?xml version="1.0" encoding="utf-8" ?>
<CodeSnippets  xmlns="<a href="http://schemas.microsoft.com/VisualStudio/2005/CodeSnippet">http://schemas.microsoft.com/VisualStudio/2005/CodeSnippet</a>">
<CodeSnippet Format="1.0.0">
<Header>
<Title>propfpc</Title>
<Shortcut>propfpc</Shortcut>
<Description>Code snippet for an automatically implemented property with property change call</Description>
<Author>Nikhil Thaker</Author>
<SnippetTypes>
<SnippetType>Expansion</SnippetType>
</SnippetTypes>
</Header>
<Snippet>
<Declarations>
<Literal>
<ID>type</ID>
<ToolTip>Property Type</ToolTip>
<Default>int</Default>
</Literal>
<Literal>
<ID>property</ID>
<ToolTip>Property Name</ToolTip>
<Default>MyProperty</Default>
</Literal>
<Literal>
<ID>_property</ID>
<ToolTip>_property Name</ToolTip>
<Default>_myProperty</Default>
</Literal>
</Declarations>
<Code Language="csharp"><![CDATA[
private $type$ $_property$;
public $type$ $property$
{
get { return $_property$;}
set { $_property$ = value; FirePropertyChanged("$property$");}
}
$end$]]>
</Code>
</Snippet>
</CodeSnippet>
</CodeSnippets>

Import Snippet to Visual Studio…

Go to Visual Studio –> Tools –> Code Snippets Manager –>Click “Import” button –> Select the snippet file you just created –> Select Location –> Click “Finish” button

Using Snippet in Visual Studio…

Now you are ready to use the snippet in Visual Studio.

  1. Open any code behind file in Visual Studio.
  2. Type shortcut you gave for snippet. In this case its “propfpc”.
  3. Press Tab key twice and bingo.. Your snippet has been implemented in file.

Here are some MSDN links for getting into more details on Visual Studio IntelliSense Snippets…

http://msdn.microsoft.com/en-us/library/ms165392(v=vs.80).aspx

http://msdn.microsoft.com/en-us/library/z4c5cc9b(v=vs.80).aspx

Here is the link for SnippetDesigner (Visual Studio Extension) on CodePlex which simplifies snippet creation…

http://snippetdesigner.codeplex.com/

Feel free to put comments, ask questions and start discussions on Visual Studio IntelliSense Snippets here.
It is the fourth flick Directed by Christopher Nolan in which Christian Bale has played the lead role and it was as awesome as last three (“Batman I & II and “The Prestige”). This movie is not really as exceptional as Christopher Nolan’s other trend setter creations like “Inception” or “The Prestige”, but definitely it is just more than good for being descendent of first two Batman movies “The Batman Begins” and “The Dark Knight Rises”.
The Dark Knight Rises
Just like previous Batman movies, here also it is a great battle between “good” and “bad”, and ultimately it is win of “good” over bad. So if you will go to see the movie with some great expectations of story and suspense, it will be the disappointment for you. The story has got nothing fancy but you will of-course feel the touch of Christopher Nolan in each and every aspect/moment of the movie. Whether it is Bruce Wayne’s release from prison in climax or the way Alfred is departing from Bruce or the belief Batman/Bruce shows in Selina even after she betrayed him or the character of Ben and Miranda who rise from the prison and tries to bury the city of “Gotham” for unjustified reasons, all are just portrayed perfect by the creator.
The Dark Knight Rises
Being fan of Christian Bale, I of-course like the dual character of Batman and Bruce Wayne he played again successfully, however the surprise here was the character of Selina played greatly by Anne Hathaway. Gary Oldman as Commissioner Gordon and Joseph Gordon Levitt as Blake (who actually ended being “Robin”) did really acted exceptionally well in their positive roles. The negative side also is well balanced by Tom Hardy as Bane and Marion Cottilard as Miranda Tate. Other characters were also crafted just picture perfect as always like Morgan Freeman as Mr. Fox and Michael Caine as Alfred.
Must see movie if you are calling yourself anything close to “fan” of Hollywood movies. Maybe the movie has got no repeat value considering the straight forward storyline and length of over two and half hours but still if are a real fan of any of the big names like Christopher Nolan, Christian Bale, Anne Hathaway or any other actor, I can bet you are going to see this flick again.

After holding PDC event for many years, Microsoft did Build Conference in 2011. After first Build conference, there were lots of roumors and supposition about whether Microsoft would be holding another build conference in 2012 or not. But finally Microsoft has put all the roumors to bed by announcing its biggest yearly event Build 2012. It will be held from October 30 – November 2 at Microsoft’s Redmond campus. Registrations will be started in few days.

Microsoft Build 2012

For now there is no official announcement over content of the conference but there must be lots of sessions on Windows 8 and of-course Windows Phone 8. Also we probably will get peek at features beyond Windows 8 and WP8. And I will be surprised of-course if we don’t get lots of knowledge sharing on Microsoft’s well acknowledged cloud platform “Azure”.

So update your calenders and be prepared, be ready for Build.

I was been writing here on my blog quite consistently on advanced Microsoft’s technologies. But for some unknown ..!! 😦 reasons, I stopped writing and didn’t make come back here on blog for long time. However for last couple of months I was planning to start rewriting here but was not getting really any motivation maybe.

Motivating Factors…

I should say that two things really motivated me to rewrite, which are…

  1. I am reading a blog regularly which has motivated me a lot… A post from the blog worth reading by almost everyone… http://gauravmantri.com/2012/05/26/dear-prospective-employees-heres-what-i-ask-of-you-and-what-you-can-expect-in-return/ …And guess what..I did get chance to work with the writer in my first job itself…yes… he is my first ex-boss, in-fact mentor I should say, as he likes to be called as well.
  2. Number of visitors my blog is receiving is in 4 digits every month .. 🙂 , that too even after stop writing for long time. So I can say my writings are little bit popular as well and so that of-course is inspiring to write more.

Subjects You Can Expect to Read Here…

Mostly I will be writing here on Microsoft Technologies and with that you will get some insight on the domains I have been working on and also the highlight of the progress of the products we are developing in my current organization.
Writing on Microsoft Technologies will include Windows 8, C#, LINQ, WCF, RIA Services, Entity Framework, Silverlight, Azure, Windows Phone, WPF, SQL Server, Visual Studio 2010, 2011, Telerik Controls and more..
In Domain and Products, largely, you will find me writing on Healthcare and Life Sciences with just conceptual idea on products we are developing with Microsoft Dot Net.

Wish Me Luck 😉 …

So finally here I am and stay tuned, stay subscribed for some interesting reading. Just feel free to put comments and to request topics you like to read. You can subscribe the blog by clicking “Follow” on right-bottom corner of your screen.

In this blog post I will show you how to manage custom window and it’s events like Minimizing Window, Maximizing Window etc… , while running the application Out Of Browser. We will also use IsolatedStorageSettings API that requires the application to be trusted.


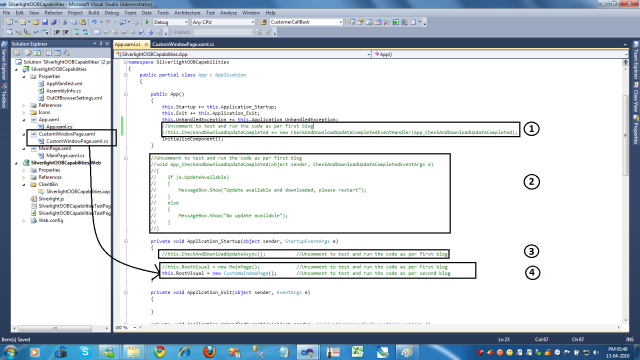
First of all I have added a new “CustomWindowPage” and then changed the RootVisual of my application as throughout this series of blog posts I will use the same solution so I have do it in App.xaml.cs file as shown in the image below.

Click the image to show in full view.
Now go to, => Silverlight Project ==> Properties ==> Silverlight Tab ==> Check the checkbox “Enable running application out of the browser” ==> Click “Out-of-Browser Settings…” button ==>check the checkbox “Require elevated trust when running outside the browser” and select the “No Border” from Window Style drop down menu as shown in the image below…
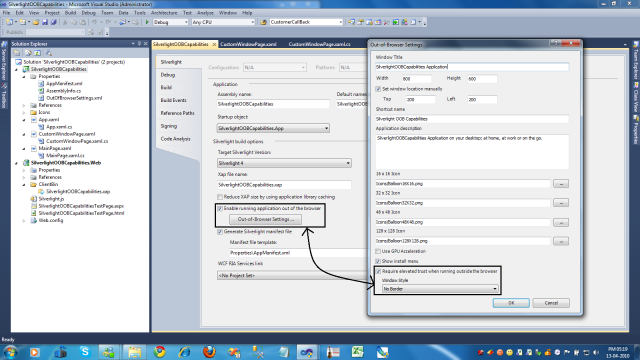
This will make changes in “OutOfBrowserSettings.xml” file as shown in the image below.

Now I have added some UI elements and wired up some events with them in the “CustomWindowPage.xaml” file as shown in the image below…

This will render the page in browser as shown in the image below…

Clicking on the “Install App” button will open the InstallWindow in the browser as shown in the Image below…
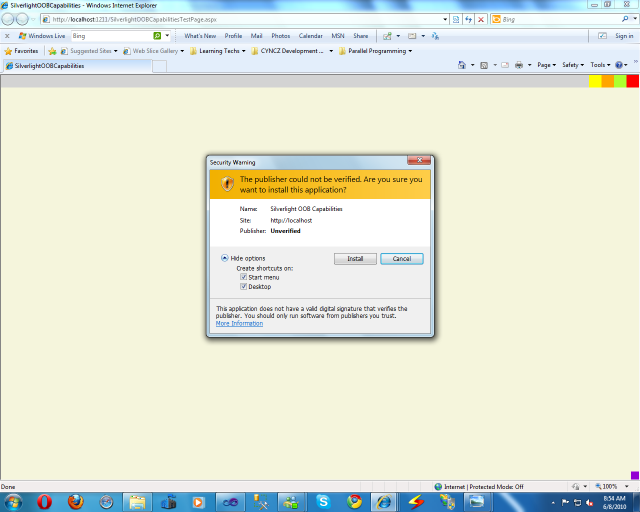
Now here one must notice couple of things,

1.> This Install Window is somehow different then in the first blog post (Check the image below).

2.> Second thing is the window in the image above is actually showing security warning to the user, who is trying to install the app on the local system.
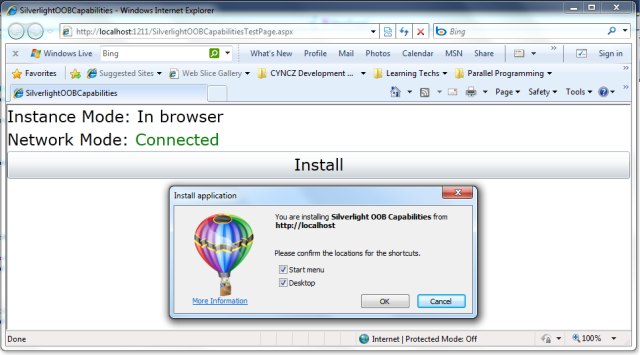
It is because in Silverlight 4 wishlist, one thing users have been asking for is to enable Silverlight out-of-browser (OOB) applications to have more privileges.  And so now with this option we can now alter the OOB manifest to request more elevated permissions for our application. So this is the install window which actually warns the user that this application can access your system more then in compare of non trusted application.

We actually need to sign the xap file here that the user does not get such security warning and I will cover that part in my future blog post in this series.

In silverlight OOB app this elevated trust is required for many functionalities like to access local files on user’s machine, for COM interoperability and lot more. I will go through all this topics particularly in my upcoming blog posts in this blog series.

Now clicking on “Install” button in install window will open the app Out of Browser as shown in the image below…
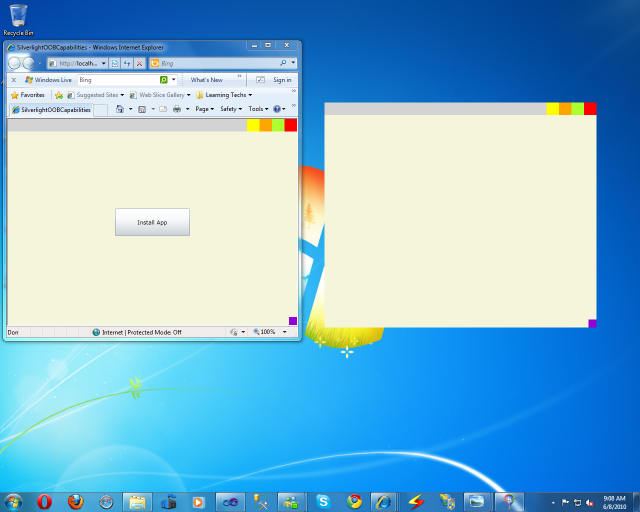
You can minimize, maximize, resize, relocate and close this window because of the code shown here in the following image…
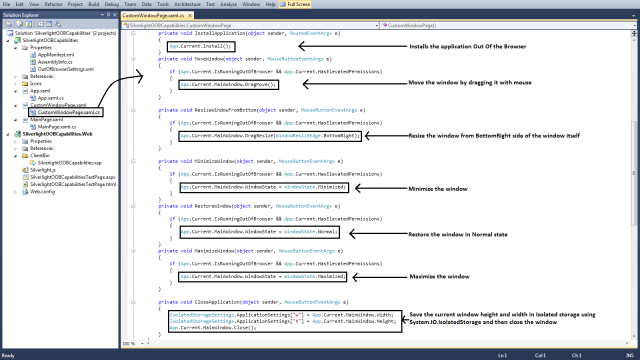
Here in the bottom of this image, there is the code to save window height and width into local system’s isolated storage. and finally following image contains the code which actually requires the elevated trust to run in our case.
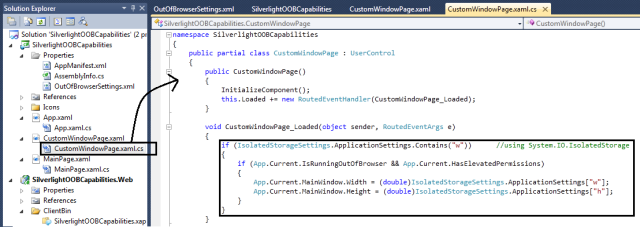
In this code we are just retrieving the height and width of the window which was saved last time when window was closed.

So it was the second part of silverlight OOB blog series. Hope you find it interesting and fill free to put comments and questions below.

For more info on silverlight, just go to, http://www.silverlight.net

For more on silverlight 4, click here, http://www.silverlight.net/getstarted/silverlight-4/

For more details on Silverlight 4.0, you can also browse through following blogs………

http://timheuer.com/blog/          —  Tim Heuer Blog – Silverlight Program Manager

http://blogs.silverlight.net/blogs/jesseliberty/       — Jesse Liberty Blog – Silverlight Program Manager

http://johnpapa.net/              —  John Papa website

http://adamkinney.wordpress.com/          — Adam Kinney Blog — For Silverlight graphics, interface and Expression Blend

First of all sorry for being late on starting this multipart blog series.

In this first part I will show you how to configure silverlight app for running OOB and also show you some basics of checking network availability and update availability from silverlight OOB application.

To configure silverlight app for running OOB,

Right Click Silverlight Project => Properties => Silverlight tab => check the checkbox “Enable running application out of browser” => Click the “Out of Browser Settings” button which will open new window with the same name.

Click the following image for larger view.

In this window some OOB settings can be configured and it will also add one “OutOfBrowserSettings.xml” file at Silverlight Project => Properties => OutOfBrowserSettings.xml.

This xml file reflects the settings made in “OutOfBrowserSettings” window and this settings can be written directly from xml file instead of window as shown in the image below.

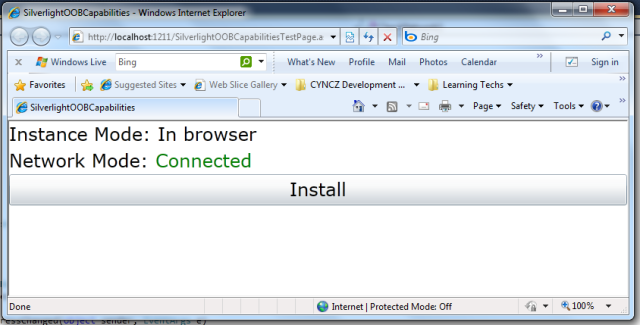
Now I have created a simple UI as in image below for checking that application is running OOB or in browser and to chech whether network is available or not. Here “Install” button will be visible only if application is running In Browser.

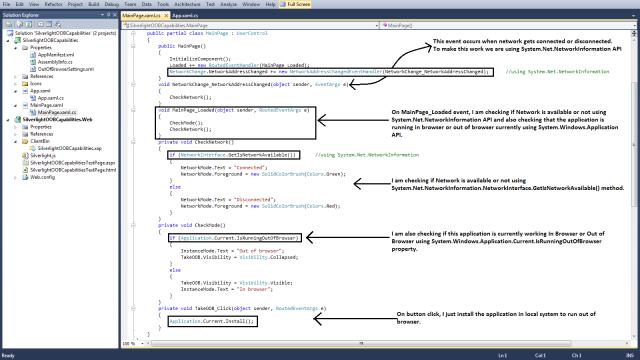
Now to check network, I am using System.Net.NetworkInformation API and to check application mode (In Browser or Out of Browser), I am using System.Windows.Application API as shown in the code below.

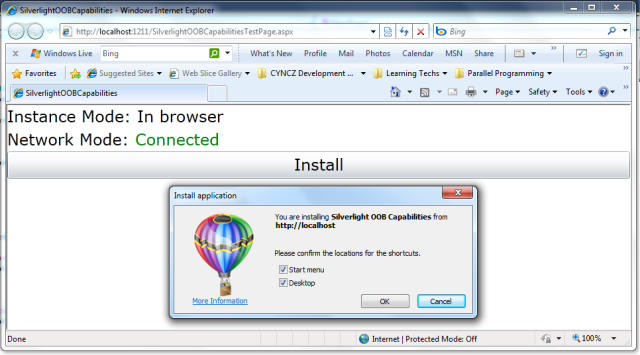
Now clicking on “Install” button will open the Install Window as shown in the image below.

Clicking on “OK” button will install the silverlight app OOB on local system and then the app can be opened as normal windows application from desktop shortcut or from start menu.

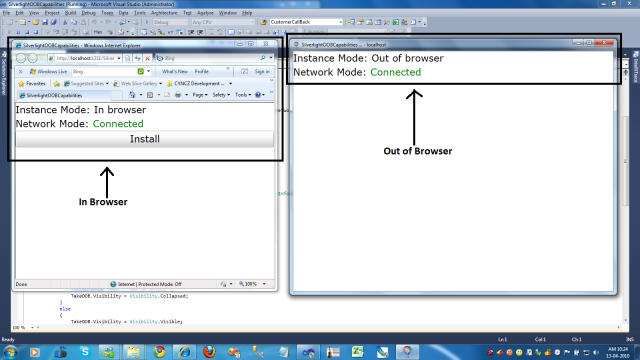
Now if we open the application simultaneously in browser and OOB, then we can see the code running successfully as shown in the image below.

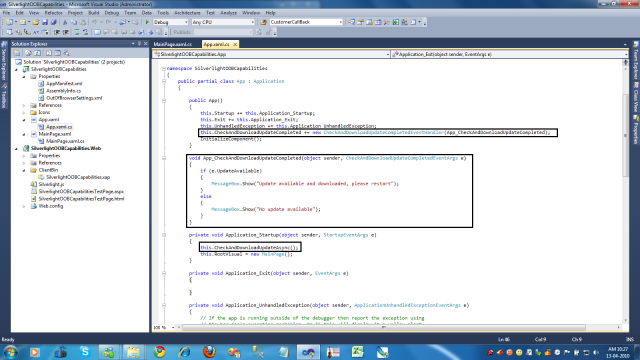
Code in the image shown below takes care of updates made in the application. This code checks for update in application and then together downloads the update as well for OOB application.

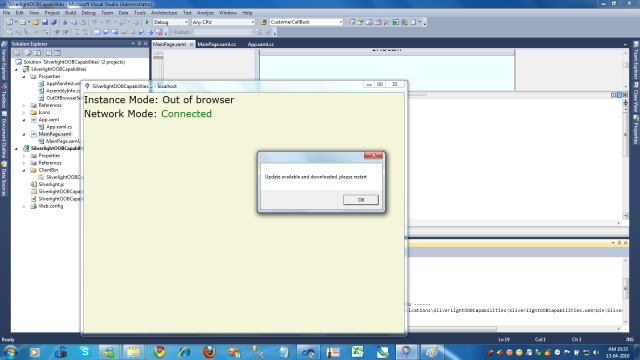
If any update (I have changed the Background colour here) found we can show the messagebox as shown below. To see the updates in OOB app, it needs to be restarted.

So this was the first part of silverlight OOB blog series. Hope you find it interesting and fill free to put comments and questions below.

For more info on silverlight, just go to, http://www.silverlight.net

For more on silverlight 4, click here, http://www.silverlight.net/getstarted/silverlight-4/

For more details on Silverlight 4.0, you can also browse through following blogs………

http://timheuer.com/blog/          —  Tim Heuer Blog – Silverlight Program Manager

http://blogs.silverlight.net/blogs/jesseliberty/       — Jesse Liberty Blog – Silverlight Program Manager

http://johnpapa.net/              —  John Papa website

http://adamkinney.wordpress.com/          — Adam Kinney Blog — For Silverlight graphics, interface and Expression Blend

I am planning for a multi part blog series on Silverlight Out Of Browser Capabilities using Silverlight 4.

Recently I have explored the silverlight’s capabilities as an Out Of Browser application and I found it’s very much sound and interesting.

But what I have noticed is all the features of silverlight OOB (Out Of Browser) capabilities are not available at one place or not really available in proper order to explore for any developer like me. So I have decided to write a multi part blog series on Silverlight’s Out Of Browser capabilities.

So in next couple of months I will write around 8 blogs on the topic and the current list of  blogs is as following……

1.> Getting Started with Silverlight’s Out of Browser Capabilities

2.> OOB Custom window and events

3.> OOB Notification API

4.> OOB Trusted File Access

5.> OOB Trusted Network Access

6.> OOB Trusted COM API

7.> OOB XAP signing for trusted Applications

8.> OOB Using Isolated Storage

I will try to publish these blogs on time and in given order.

As I will write the blog, I will link that blog with the list given here that anyone can simply browse through any blog on the topic from here only.

I will use Windows 7 Ultimate 64 bit, Visual Studio 2010 and Silverlight 4.0 throghout the blog series.

In my last blog post I had explained the two standard ways of  validating data in Silverlight 4. One way was implementing “INotifyProprtyChanged” interface. And the second way was “INotifyDataErrorInfo” interface, which is the new option available with Silverlight 4 for validating data.

Now in this blog post I will show, how we can use the validation asynchronously with “INotifyDataErrorInfo” interface in Silverlight 4.

Simple Scenario where Asynchronous Validation can be useful:

Assume that we are just registering new users for a website accepting username and password in Silverlight front-end UI. Now when user enters the preffered username, we need to check that preffered username is available or not. So we just call the web service for checking the availability of preffered username. But as we are using Asynchronous Data Validation to perform this username validation, and so while the web service returns the response, Silverlight front-end UI still remains available for User for entering password and so on……….

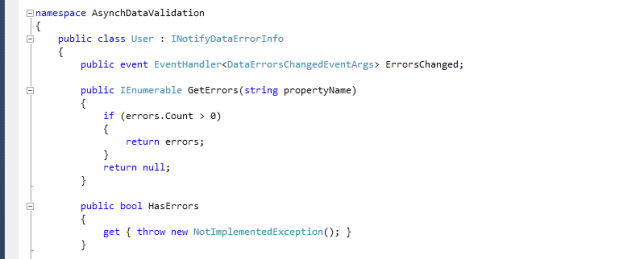
Here is the Entity class “User” which implements the “INotifyDataErrorInfo” interface as shown in the image below……

Here is the property “username” in the entity class “User” which is getting validated asynchronously…….

In this code “WebService.CheckUserNameAvailability(string userName, UserNameCallBack callBackMethod)” accepts userName as first parameter and CallBackMethod for UserNameCallBack delegate as a second parameter. So Web Service returns the response by calling this callBackDalegateMethod and passing “isUserNameAvailable” variable in the method. Then this method process the validation as shown in the image below………

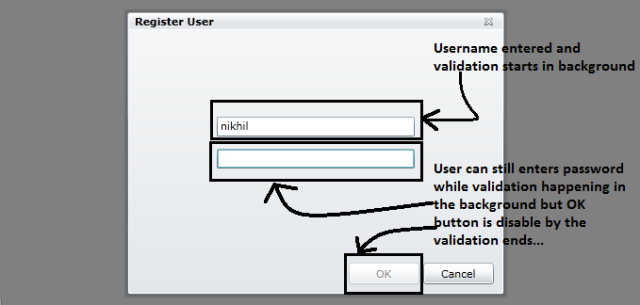
So this callBackDalegateMethod will be called whenever the WebService will be ready with the response. So if web service returns the response in say 10 seconds, by the time, User can enter the password and so on.. And we can keep the “OK” button disable by that time as User can not click it before validation completes on “UserName” as shown in the image below…..

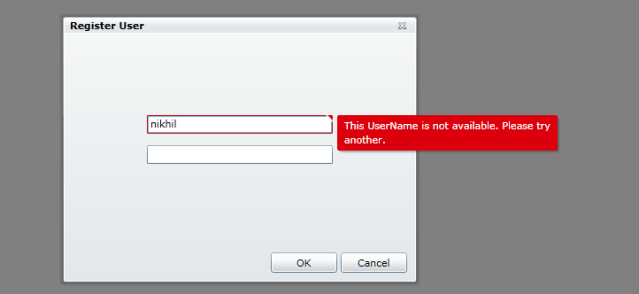
After this asynchronous validation, if UserName will not be available silverlight validation framework generates the error visualisation as shown in the image below……


So it was all about Asynchronous Data Validation with Silverlight 4.

For more info on silverlight, just go to, http://www.silverlight.net

For more on silverlight 4, click here, http://www.silverlight.net/getstarted/silverlight-4/

For more details on Silverlight 4.0, you can also browse through following blogs………

http://timheuer.com/blog/          —  Tim Heuer Blog – Silverlight Program Manager

http://blogs.silverlight.net/blogs/jesseliberty/       — Jesse Liberty Blog – Silverlight Program Manager

http://johnpapa.net/              —  John Papa website

http://adamkinney.wordpress.com/          — Adam Kinney Blog — For Silverlight graphics, interface and Expression Blend