Tag Archive: Silverlight


In this blog post I will show you how to manage custom window and it’s events like Minimizing Window, Maximizing Window etc… , while running the application Out Of Browser. We will also use IsolatedStorageSettings API that requires the application to be trusted.


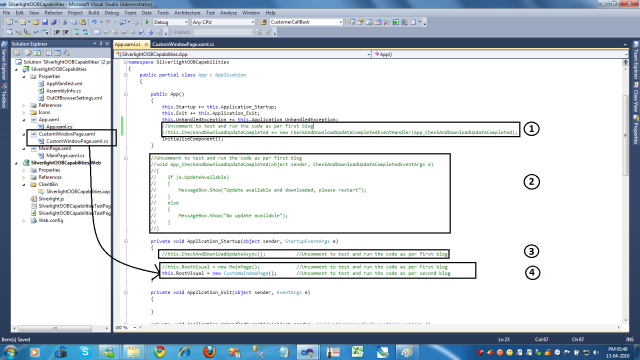
First of all I have added a new “CustomWindowPage” and then changed the RootVisual of my application as throughout this series of blog posts I will use the same solution so I have do it in App.xaml.cs file as shown in the image below.

Click the image to show in full view.

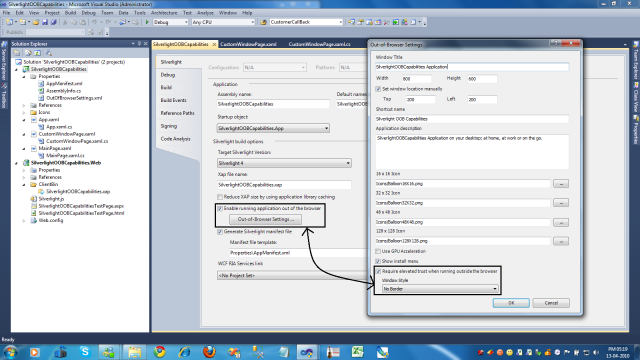
Now go to, => Silverlight Project ==> Properties ==> Silverlight Tab ==> Check the checkbox “Enable running application out of the browser” ==> Click “Out-of-Browser Settings…” button ==>check the checkbox “Require elevated trust when running outside the browser” and select the “No Border” from Window Style drop down menu as shown in the image below…

This will make changes in “OutOfBrowserSettings.xml” file as shown in the image below.

Now I have added some UI elements and wired up some events with them in the “CustomWindowPage.xaml” file as shown in the image below…

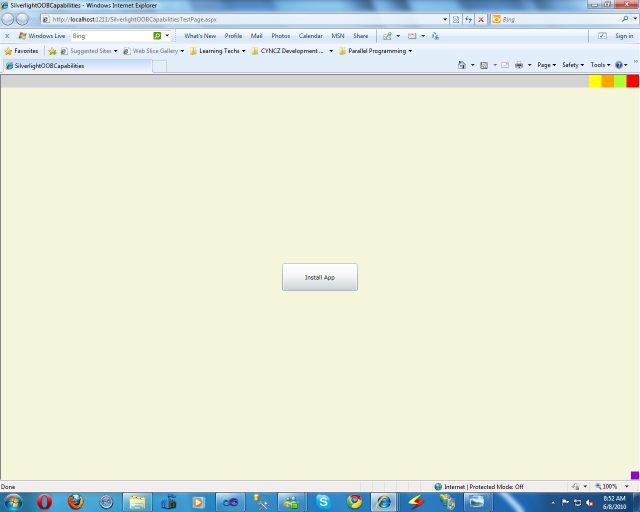
This will render the page in browser as shown in the image below…

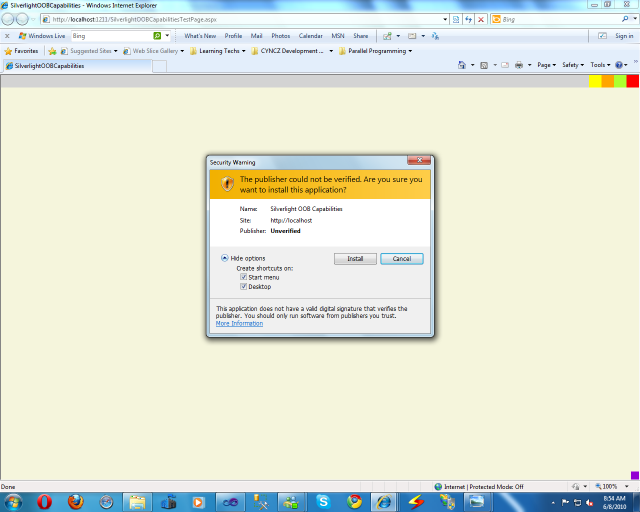
Clicking on the “Install App” button will open the InstallWindow in the browser as shown in the Image below…

Now here one must notice couple of things,

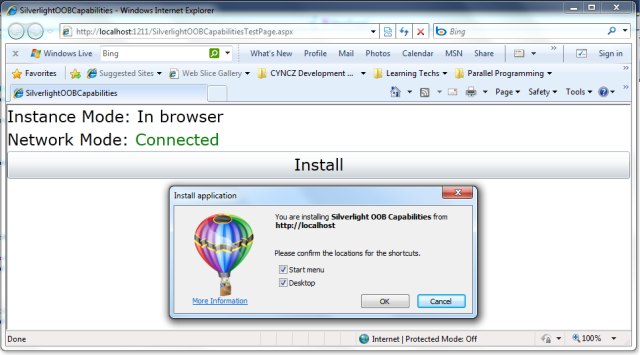
1.> This Install Window is somehow different then in the first blog post (Check the image below).

2.> Second thing is the window in the image above is actually showing security warning to the user, who is trying to install the app on the local system.

It is because in Silverlight 4 wishlist, one thing users have been asking for is to enable Silverlight out-of-browser (OOB) applications to have more privileges.  And so now with this option we can now alter the OOB manifest to request more elevated permissions for our application. So this is the install window which actually warns the user that this application can access your system more then in compare of non trusted application.

We actually need to sign the xap file here that the user does not get such security warning and I will cover that part in my future blog post in this series.

In silverlight OOB app this elevated trust is required for many functionalities like to access local files on user’s machine, for COM interoperability and lot more. I will go through all this topics particularly in my upcoming blog posts in this blog series.

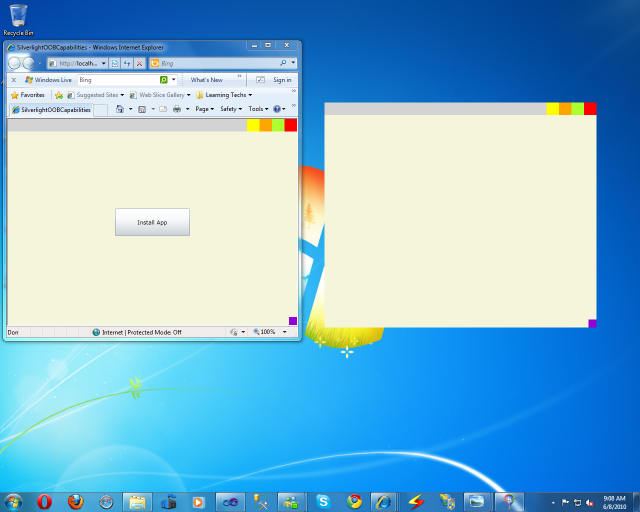
Now clicking on “Install” button in install window will open the app Out of Browser as shown in the image below…

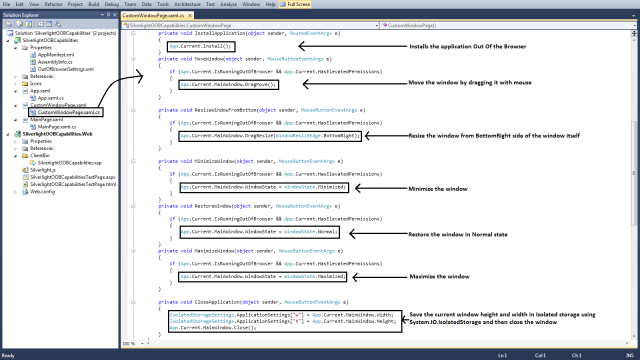
You can minimize, maximize, resize, relocate and close this window because of the code shown here in the following image…

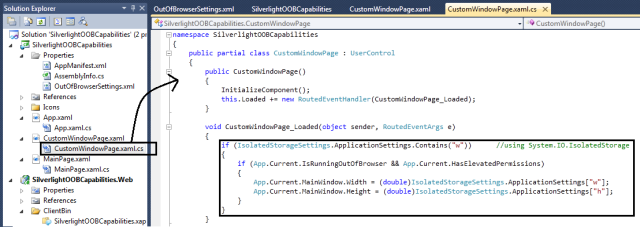
Here in the bottom of this image, there is the code to save window height and width into local system’s isolated storage. and finally following image contains the code which actually requires the elevated trust to run in our case.

In this code we are just retrieving the height and width of the window which was saved last time when window was closed.

So it was the second part of silverlight OOB blog series. Hope you find it interesting and fill free to put comments and questions below.

For more info on silverlight, just go to, http://www.silverlight.net

For more on silverlight 4, click here, http://www.silverlight.net/getstarted/silverlight-4/

For more details on Silverlight 4.0, you can also browse through following blogs………

http://timheuer.com/blog/          —  Tim Heuer Blog – Silverlight Program Manager

http://blogs.silverlight.net/blogs/jesseliberty/       — Jesse Liberty Blog – Silverlight Program Manager

http://johnpapa.net/              —  John Papa website

http://adamkinney.wordpress.com/          — Adam Kinney Blog — For Silverlight graphics, interface and Expression Blend

First of all sorry for being late on starting this multipart blog series.

In this first part I will show you how to configure silverlight app for running OOB and also show you some basics of checking network availability and update availability from silverlight OOB application.

To configure silverlight app for running OOB,

Right Click Silverlight Project => Properties => Silverlight tab => check the checkbox “Enable running application out of browser” => Click the “Out of Browser Settings” button which will open new window with the same name.

Click the following image for larger view.

In this window some OOB settings can be configured and it will also add one “OutOfBrowserSettings.xml” file at Silverlight Project => Properties => OutOfBrowserSettings.xml.

This xml file reflects the settings made in “OutOfBrowserSettings” window and this settings can be written directly from xml file instead of window as shown in the image below.

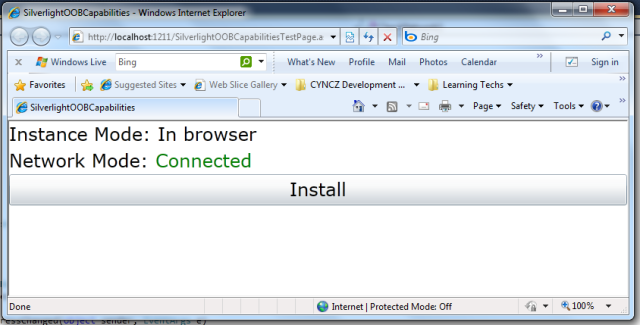
Now I have created a simple UI as in image below for checking that application is running OOB or in browser and to chech whether network is available or not. Here “Install” button will be visible only if application is running In Browser.

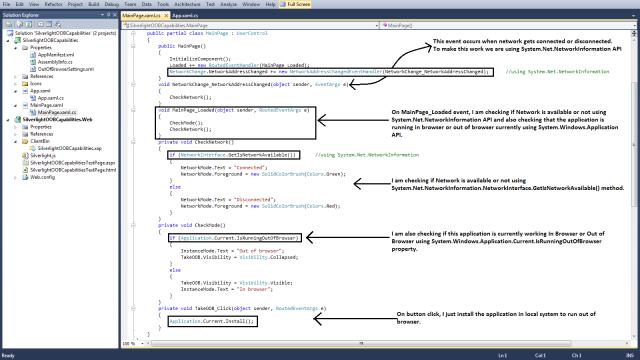
Now to check network, I am using System.Net.NetworkInformation API and to check application mode (In Browser or Out of Browser), I am using System.Windows.Application API as shown in the code below.

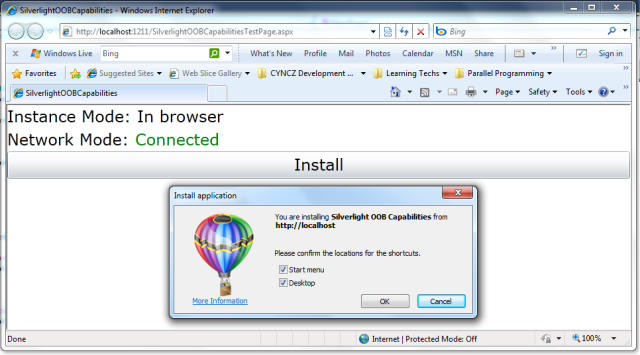
Now clicking on “Install” button will open the Install Window as shown in the image below.

Clicking on “OK” button will install the silverlight app OOB on local system and then the app can be opened as normal windows application from desktop shortcut or from start menu.

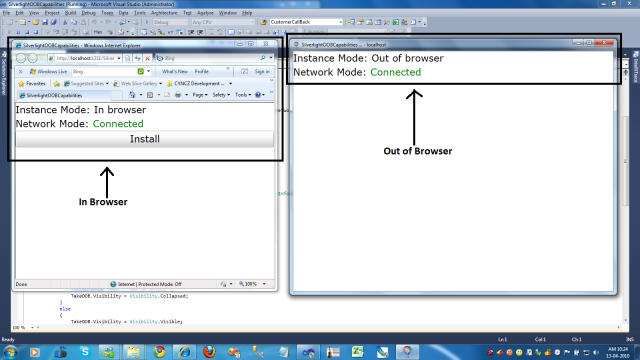
Now if we open the application simultaneously in browser and OOB, then we can see the code running successfully as shown in the image below.

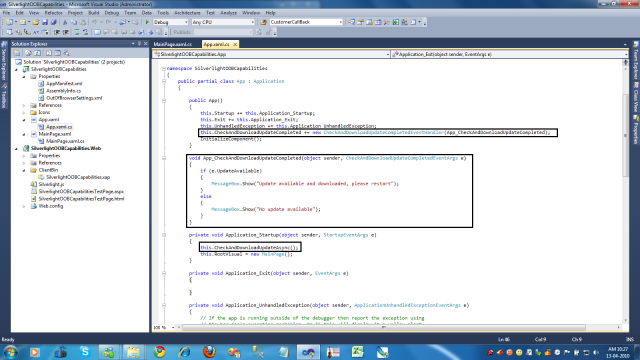
Code in the image shown below takes care of updates made in the application. This code checks for update in application and then together downloads the update as well for OOB application.

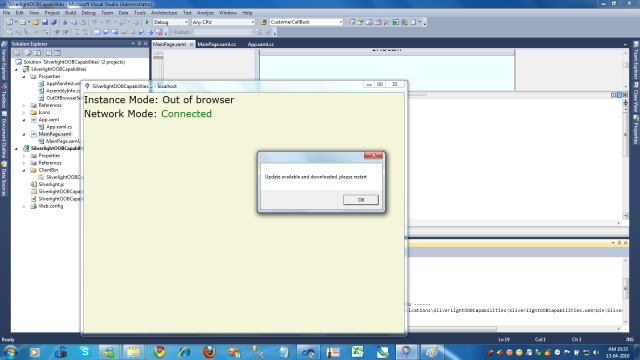
If any update (I have changed the Background colour here) found we can show the messagebox as shown below. To see the updates in OOB app, it needs to be restarted.

So this was the first part of silverlight OOB blog series. Hope you find it interesting and fill free to put comments and questions below.

For more info on silverlight, just go to, http://www.silverlight.net

For more on silverlight 4, click here, http://www.silverlight.net/getstarted/silverlight-4/

For more details on Silverlight 4.0, you can also browse through following blogs………

http://timheuer.com/blog/          —  Tim Heuer Blog – Silverlight Program Manager

http://blogs.silverlight.net/blogs/jesseliberty/       — Jesse Liberty Blog – Silverlight Program Manager

http://johnpapa.net/              —  John Papa website

http://adamkinney.wordpress.com/          — Adam Kinney Blog — For Silverlight graphics, interface and Expression Blend

I am planning for a multi part blog series on Silverlight Out Of Browser Capabilities using Silverlight 4.

Recently I have explored the silverlight’s capabilities as an Out Of Browser application and I found it’s very much sound and interesting.

But what I have noticed is all the features of silverlight OOB (Out Of Browser) capabilities are not available at one place or not really available in proper order to explore for any developer like me. So I have decided to write a multi part blog series on Silverlight’s Out Of Browser capabilities.

So in next couple of months I will write around 8 blogs on the topic and the current list of  blogs is as following……

1.> Getting Started with Silverlight’s Out of Browser Capabilities

2.> OOB Custom window and events

3.> OOB Notification API

4.> OOB Trusted File Access

5.> OOB Trusted Network Access

6.> OOB Trusted COM API

7.> OOB XAP signing for trusted Applications

8.> OOB Using Isolated Storage

I will try to publish these blogs on time and in given order.

As I will write the blog, I will link that blog with the list given here that anyone can simply browse through any blog on the topic from here only.

I will use Windows 7 Ultimate 64 bit, Visual Studio 2010 and Silverlight 4.0 throghout the blog series.

In my last blog post I had explained the two standard ways of  validating data in Silverlight 4. One way was implementing “INotifyProprtyChanged” interface. And the second way was “INotifyDataErrorInfo” interface, which is the new option available with Silverlight 4 for validating data.

Now in this blog post I will show, how we can use the validation asynchronously with “INotifyDataErrorInfo” interface in Silverlight 4.

Simple Scenario where Asynchronous Validation can be useful:

Assume that we are just registering new users for a website accepting username and password in Silverlight front-end UI. Now when user enters the preffered username, we need to check that preffered username is available or not. So we just call the web service for checking the availability of preffered username. But as we are using Asynchronous Data Validation to perform this username validation, and so while the web service returns the response, Silverlight front-end UI still remains available for User for entering password and so on……….

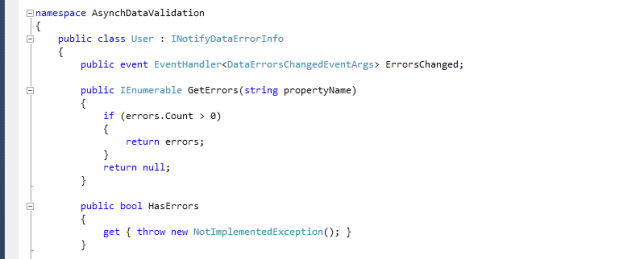
Here is the Entity class “User” which implements the “INotifyDataErrorInfo” interface as shown in the image below……

Here is the property “username” in the entity class “User” which is getting validated asynchronously…….

In this code “WebService.CheckUserNameAvailability(string userName, UserNameCallBack callBackMethod)” accepts userName as first parameter and CallBackMethod for UserNameCallBack delegate as a second parameter. So Web Service returns the response by calling this callBackDalegateMethod and passing “isUserNameAvailable” variable in the method. Then this method process the validation as shown in the image below………

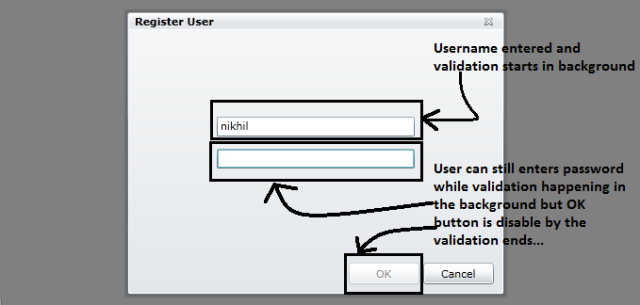
So this callBackDalegateMethod will be called whenever the WebService will be ready with the response. So if web service returns the response in say 10 seconds, by the time, User can enter the password and so on.. And we can keep the “OK” button disable by that time as User can not click it before validation completes on “UserName” as shown in the image below…..

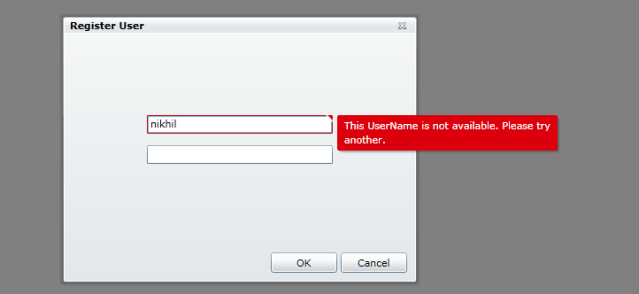
After this asynchronous validation, if UserName will not be available silverlight validation framework generates the error visualisation as shown in the image below……


So it was all about Asynchronous Data Validation with Silverlight 4.

For more info on silverlight, just go to, http://www.silverlight.net

For more on silverlight 4, click here, http://www.silverlight.net/getstarted/silverlight-4/

For more details on Silverlight 4.0, you can also browse through following blogs………

http://timheuer.com/blog/          —  Tim Heuer Blog – Silverlight Program Manager

http://blogs.silverlight.net/blogs/jesseliberty/       — Jesse Liberty Blog – Silverlight Program Manager

http://johnpapa.net/              —  John Papa website

http://adamkinney.wordpress.com/          — Adam Kinney Blog — For Silverlight graphics, interface and Expression Blend
With silverlight 3 we were able to validate data using ‘INotifyPropertyChanged’  (System.ComponenetModel.INotifyPropertyChanged) interface.

Now in silverlight 4 we have one new interface called ‘INotifyDataErrorInfo’  (System.ComponenetModel.INotifyDataErrorInfo) as well.


Any Entity class can implement both or any of these interfaces to validate the data.

I am using the Entity class “User” to validate the data (Name and Email) as shown in the image below……

Here “Name” is validating through “INotifyDataErrorInfo” and “Email” is validating through “INotifyPropertyChanged”.

Validation using “INotifyPropertyChanged” :

To use “INotifyPropertyChanged”, we need to implement one event “PropertyChanged” in code behind file as shown in the image above (second image in the post).

We also need to set couple of attributes (“ValidatesOnExceptions”, “NotifyOnValidationError”) on the control in XAML code which actually performs the validation as shown in the image below……

Now when the value of property “email” is changed, code in the following image throws an exception…..

And this exception is then handled by silverlight validation framework and it creates the error visualization on silverlight control as shown in the folowing image…….

Validation using “INotifyDataErrorInfo” :

To use “INotifyDataErrorInfo” we need to implement one event “ErrorsChanged”, one method “GetErrors” and one property “HasErrors” in the code behind file as shown in the image above (second image in the current blog post).

Here we do not need to implement anything in XAML code to perform validation as in case of “INotifyPropertyChanged”.

Now when the value of property “name” is changed, code in the following image validates the value of “name” and called the event “ErrorsChanged” and which in turns called the method “GetErrors()” which returns the “errors” (or null if there is no error) as shown in the image below…….

And then if “GetError()” method returns any error is then handled by silverlight validation framework and it creates the error visualization on silverlight control as shown in the folowing image…….

Silverlight validation framework seems lot more sound with silverlight 4 now in compare with silverlight 3. Silverlight 4 validation framework also supports “Asynchronous Data Validation”, which I will discuss in my next silverlight blog post.

 For more info on silverlight, just go to, http://www.silverlight.net

For more on silverlight 4, click here, http://www.silverlight.net/getstarted/silverlight-4/

For more details on Silverlight 4.0, you can also browse through following blogs………

http://timheuer.com/blog/          —  Tim Heuer Blog – Silverlight Program Manager

http://blogs.silverlight.net/blogs/jesseliberty/       — Jesse Liberty Blog – Silverlight Program Manager

http://johnpapa.net/              —  John Papa website

http://adamkinney.wordpress.com/          — Adam Kinney Blog — For Silverlight graphics, interface and Expression Blend
In my last blog on Telerik’s Gridview Control, I just discussed couple of issues, I was encountered while using Telerik’s GridView.

Telerik’s Grid View control usually comes without any hierarchy by default like in the following image……..

Click the image for full view……

In my this blog post I will explain that how we can extend Telerik’s Grid View control for multiple hierarchy.

It’s required when you need to achive multiple hierarchy in Grid View like following image……..

Click the image for full view……

So first of all I will show that how can this Grid View control can be extende using simle XAML code and then I will move to c# code for Grid View extention.

XAML code to extend GridView control for multiple hierarchy using GridView Table Definition : (It creates another grid view inside one grid view)

This simple XAML code creates the one Grid View inside the another just shown as in image above……
But what if My need is to create say 10 hierarchycal Grid Views… And here the code behind comes to make the solution easy.

C# code for extending GridView control for multiple hierarchy: (with this code you can create 10 grid views – one inside another but off course you can create like infinite grid views by increasing the value from 10)

This code can create the Grid View as shown in the figure below……..

Click the image for full view……

So you have seen that it’s just so easy to extend Telerik’s GridView control for multiple hierarchy.

In my next blog on Telerik’s Grid View, I will show you that how we can dynamically add the design elements(Controls) in the ‘RowDetailsTemplate’ of Telerik’s Grid View Control and make it more useful.

For more information on Telerik’s Silverlight RadGridView control please browse to, http://www.telerik.com/products/silverlight/gridview.aspx

Currently I am working with Telerik’s Silverlight GridView control and while working, I just stuck to some issues which I would like to describe here. I will keep on adding parts in this blog series as I will explore Telerik’s GridView more and more.

Issue 1. How to access standard silverlight controls lying inside Telerik’s RadGridView (infact inside the RowDetailsTemplate of RadGridView) to generate dynamic RowDetailsTemplate for RadGridView
Solution : To access the StackPanel(Standard Silverlight Control) inside the RowDetailsTemplate of the Telerik’s RadGridView we can use “LoadingRowDetails” event of the RadGridView and then we can get the StackPanel using ‘GridViewRowDetailsEventArgs e’ and following c# code…….

StackPanel sp = e.DetailsElement.FindName(“x:NameOfTheStackPanel”);

Issue 2. How to access GridViewColumn of RadgridView programmatically with c# code
Solution :
To access the GridViewColumn of RadGridView we can use the following c# code…….

GridViewColumn gvc = RadGridViewName.Columns[“UniqueNameOfGridViewColumn”];

Telerik’s RadControls for Silverlight are really working great so I suggest,

In part two of this blog series I will discuss how to make telerik’s GridView hirarchical using simle c# code.

Hi guys, if you are a Flash lover then it’s time to breakup now… because when you know the Silverlight 4.0 features in detail you will be definitely fall in love with Silverlight 4.0.

Silverlight 4.0

 Whether you are a flashy designer or developer who likes to design highly interactive games or websites or you are a high level Business Application Developer who needs great hold over the data, Silverlight 4.0 has the treat for both……

  • If you are a flashy website designer then you should get started exploring following new features in Silverlight 4.0 ……….

1.> Right Mouse Click Support

2.> Mouse Wheel Support

3.> Accessing Web Camera and Microphone

4.> Silverlight Controls as Drop Targets – Drag and Drop Support

5.> Hosting HTML Content – Now you can render HTML in Silverlight

6.> Local File Access – File from Local System can be accessed

7.> “RichtextArea” and “ViewBox” Controls

8.> Right to Left Language Support – For Languages like Hebrew and Urdu and lot more…

9.> Programmatically access to Global Clipboard

  • If you are a multitier Business Application Developer with complex architecture, you can start understanding Silverlight 4.0 with following new features……….

1. RIA Services support in Silverlight 4.0 with Visual Studio 2010

2. MEF for Application Extensibility – It’s Managed Extensibility Framework (MEF)

3. Network Authentication and Trusted Network Access

4. COM Object Access in Trusted Applications – Now you can access applications in Local System

5. Asynchronous Data Validations

6. DataGrid Enhancements in Silverlight 4.0

7. Printing APIs

8. Notification API

  • Some of these features are working with “Out Of Browser Applications” developed in Silverlight 4.0.
  • Currently only Silverlight 4.0 Developer Runtime is available.

I have already explored all these features and believe me, Silverlight 4.0 is simply rocking!!!

For more details on Silverlight 4.0 click any of the following links,

http://silverlight.net/getstarted/silverlight-4-beta/                   —  Official Microsoft Silverlight website

http://timheuer.com/blog/          —  Tim Heuer Blog – Silverlight Program Manager

http://blogs.silverlight.net/blogs/jesseliberty/       — Jesse Liberty Blog – Silverlight Program Manager

http://johnpapa.net/              —  John Papa website

http://adamkinney.wordpress.com/          — Adam Kinney Blog — For Silverlight graphics, interface and Expression Blend